
At the moment this are growing well well indeed. A product well worth buying!
Didnt work, injected with lq that worked in previous project. package arrived a little but damaged and later then expected

If you've ever looked at a pack of shiitake mushrooms at the supermarket and thought, "I could probably grow these myself," - you were right. And it's a lot easier than you think.
Most people assume mushroom cultivation is this complicated, lab-coat kind of hobby. Sterile rooms, expensive equipment, a biology degree. But the truth is, you can grow a solid flush of oyster mushrooms on your kitchen counter with nothing more than the right supplies and a spray bottle. That's genuinely it.
This guide is for complete beginners. We'll walk through everything - what you actually need, which mushroom to start with, and what to expect week by week. No fluff, no overcomplicated science. Just practical steps that work.
Fair question. Fresh mushrooms are available in most supermarkets, so why go through the effort?
A few reasons that tend to stick with people once they try it:
The flavour difference is real. Freshly harvested oyster or shiitake mushrooms taste completely different from what you get in a supermarket bag. The texture is firmer, the taste is deeper and richer.
It's genuinely relaxing. There's something satisfying about watching mycelium colonise a bag, then seeing tiny pins emerge from nowhere. People who get into mushroom growing often describe it as meditative. It's slow, quiet, and rewarding.
It's cost-effective over time. A single colonised block can produce multiple flushes. Once you understand the process, the cost per harvest drops significantly compared to buying fresh gourmet mushrooms regularly.
It's a useful skill. Once you understand the basics, you can grow almost any variety - oyster, shiitake, lion's mane, king oyster. The fundamentals are the same across all of them.
Before you get into substrate recipes and humidity percentages, you need to pick the right variety. This is probably the single most important decision for a first-time grower.
Start with oyster mushrooms. Almost every experienced cultivator will tell you the same thing, and there's a good reason for it.
Oyster mushrooms are forgiving in a way that other varieties simply aren't. They colonise quickly, they're resistant to contamination, they tolerate temperature swings, and they fruit reliably even if your conditions aren't perfect. Most beginners see their first pins within 3-4 weeks of inoculation.
Compare that to shiitake, which takes longer to colonise and has stricter fruiting requirements - or lion's mane, which is more sensitive to CO2 levels and needs more careful humidity management. Both are very doable, but not ideal as your very first grow.
Once you've grown oysters a couple of times and understand how the process feels, moving to other varieties becomes much more intuitive.
Popular oyster varieties and their temperature ranges:
For most European beginners growing indoors, blue or pearl oyster is the safest starting point. In summer, pink oyster is a great option.
This is where it gets interesting - because mushroom growing isn't one thing. It's a spectrum, and you can start wherever makes sense for you.
The simplest possible entry point. A ready-to-fruit block is a fully colonised substrate block that just needs the right conditions to start producing mushrooms. You cut open the bag, keep it misted and in indirect light, and wait. Pins typically appear within days.
There's no mixing, no inoculation, no risk of contamination during preparation. The hard part is already done. This is a great way to see what fruiting looks like, build confidence, and eat your first homegrown mushrooms without any guesswork.
A step up in involvement, but still very beginner-friendly. An all-in-one grow bag contains both substrate and grain in a single pre-sterilised bag with a filter patch and injection port. Because everything is already inside a sealed bag, you never need to open it and mix things together - which is the main point where contamination happens.
You simply inject a liquid culture through the port using a syringe and wait for the mycelium to colonise. The port seals itself once you withdraw the needle. Once the bag is fully white, you initiate fruiting the same way as a ready-to-fruit block.
It's a clean, low-risk way to learn the full colonisation process without the complexity of preparing and mixing substrate yourself.
This is where you start doing more of the work yourself - and learning more as a result. You take a bag of sterile substrate (typically supplemented sawdust or straw) and inoculate it with mushroom spawn. This does require opening the bag and mixing in a clean environment, which introduces some contamination risk. Working quickly, cleaning your surface well, and using good-quality spawn keeps that risk low.
The advantage here is flexibility. You can choose your substrate, your spawn strain, your inoculation rate. You're in control of more variables, which means more to learn - but also more to optimise.
The deepest end of the pool. Preparing your own grain spawn means sourcing grain, sterilising it, inoculating with a culture, and waiting for colonisation. Preparing your own substrate means sourcing raw materials, pasteurising or sterilising depending on the type, and mixing everything yourself.
It's rewarding and eventually cost-effective at scale - but for a beginner, it's also the level with the most failure points. Sterilisation that falls short, grain that wasn't hydrated correctly, contamination during inoculation - there's a lot that can go wrong before you've developed the intuition to catch it early.
Most experienced growers would tell you: there's no rush to get here. Learn the process first, understand what healthy colonisation looks and smells like, and then start pulling more steps in-house when you're ready.
Let's keep this realistic. You don't need a lab. What you need depends on which level you're starting at.
For a ready-to-fruit block:
For an all-in-one grow bag + liquid culture:
For mushroom spawn + sterile substrate:
Useful regardless of your approach:
You do not need an autoclave, a laminar flow hood, or anything that costs hundreds of euros - at least not for your first grow.
Mushrooms are fungi, not plants. They don't photosynthesize - instead, they break down and feed on organic matter: dead wood, straw, agricultural byproducts. In cultivation, we recreate those conditions in a controlled way.
The most common substrates for oyster mushrooms:
For your first grow, using a sterile substrate that's already been prepared removes one of the biggest variables. You can focus entirely on the colonisation and fruiting stages - which is where the real understanding develops.
The all-in-one grow bag is where most beginners start, and for good reason. Everything you need is already inside a single sterile bag - substrate, grain, filter patch, and an injection port. You never need to open it or mix anything in the open air, which is the main point where contamination happens in more advanced setups. It's genuinely one of the cleanest and most beginner-friendly ways to learn the full colonisation process.
Here's how it works from start to harvest.
You'll need:
That's it. No mixing, no open substrate, no sterilisation on your end.
Set everything you need within arm's reach before you start. Spray your gloves, the syringe, and your entire working surface with isopropyl alcohol and dry everything off with paper towels. Spray the injection port too, then lay a fresh paper towel lightly over it - leave it there until the very last moment before you inoculate. This keeps the port clean while you get everything else ready.
When you're set, attach the needle to the syringe if it isn't already. Heat the tip with a lighter for a few seconds until it turns red, then let it cool for 1-2 seconds. Don't wipe the needle after heating - and make sure there's no alcohol residue on it before the flame, as isopropyl is flammable.
Remove the paper towel from the port, insert the needle pointing toward the grain section of the bag, and inject 3-6ml of liquid culture depending on bag size. Then slowly withdraw the needle. That's it - you've just inoculated your first grow bag. The injection port seals itself once the needle is out.
Place the bag somewhere dark and clean at room temperature. The mycelium doesn't need light at this stage - just a stable environment and no disturbance.
The mycelium will colonise the grain first - you'll see white fuzz spreading across the individual grains around the inoculation point. Once roughly 50% of the grain looks colonised, gently mix the bag by squeezing and turning it from the outside without opening it. This distributes the colonised grain through the rest of the substrate and speeds up the process significantly.
After mixing, the bag will look patchy for a day or two, then the white will spread quickly through the rest. A fully colonised bag looks bright white throughout, feels firm, and has a clean, earthy smell. That's your signal to move to fruiting.
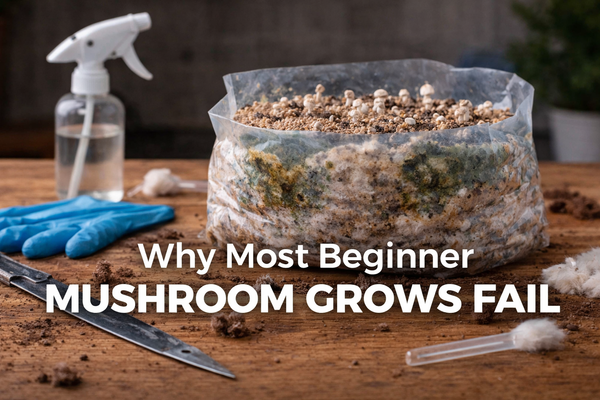
Watch for: green, black, or slimy patches - these mean contamination. Remove the bag immediately. It happens, especially early on. Don't be discouraged - it's almost always a learning moment, not a reason to quit.
Cut an opening in the bag - either a few slits on the side or open the top, depending on the variety. This is where the mushrooms will emerge. Move the bag somewhere with indirect light or light shade and:
Within 3-7 days of initiating fruiting you'll see tiny pins forming - and a full first flush is typically ready within 2 weeks of full colonisation. They develop quickly from here.
Harvest before the caps flatten out completely. The ideal moment is when the edges are still slightly curved under - that's peak flavour and texture. Once caps start to flatten and release spores (you'll notice a fine white dust on nearby surfaces), you've waited a bit too long.
Grip the cluster at the base, twist gently, and pull. Remove any remaining stumps cleanly to avoid rot setting in.
Mist the area, let the block rest for 5-10 days, and repeat. Most blocks produce 2-4 flushes before yields drop off. The first two are usually the largest.
This is just one way to grow mushrooms at home. Want a step-by-step for the other methods too - starting from mushroom spawn and sterile substrate, or growing from a ready-to-fruit block? Let us know in the comments and we'll put the next guide together.
You don't need to obsess over these numbers, but understanding them saves a lot of frustration.
Temperature by variety:
Most European homes are naturally in the right range for blue, pearl, and yellow oysters without any special setup.
Humidity:
During colonisation, the sealed bag handles everything - no intervention needed. During fruiting, you want the exposed surface to stay consistently moist. Misting 2-3 times a day works well. If your home is on the drier side, placing the bag inside a larger plastic bag or tube and fanning it with a piece of paper a few times daily is the simplest way to maintain humidity while still getting fresh air exchange.
Fresh air:
Mushrooms produce CO2 and need it to stay low. Too much CO2 leads to long, leggy stems with small caps - a clear sign the air isn't moving enough. You don't need a fan; just make sure the space breathes a little each day.
Inoculating when the substrate is still warm. Heat kills mycelium. If you've prepared your own substrate, let it cool completely - below 30°C - before adding spawn. With pre-sterilised bags from a supplier this is usually already handled, but worth knowing.
Letting the fruiting surface dry out. The surface where mushrooms emerge needs to stay moist. If it dries out between mistings, pins either don't form or abort early. Mist more frequently or add a humidity tent.
Poor airflow during fruiting. Long, pale stems and small caps are almost always a CO2 problem. It doesn't take much - just make sure the space breathes.
Harvesting too late. Once caps flatten and start releasing spores (you'll notice a white dusting on nearby surfaces), flavour drops and the mushrooms don't store as well. Harvest a little early rather than a little late.
Getting discouraged by contamination. It happens to everyone. The goal is to understand why it happened - was the bag open too long? Was the substrate still warm? - and adjust next time.
Freshly harvested mushrooms should ideally go straight to the pan within a day or two. They don't have the same shelf life as commercial mushrooms because they haven't been modified atmosphere-packed.
A few simple ways to use them:
If you're producing more than you can eat fresh, drying is the best option. It's also satisfying in a different way - watching the jar fill up over multiple harvests.
The best thing about growing mushrooms at home is that the learning curve is shorter than most people expect. The first grow is the hardest - mostly because you don't yet know what to expect. The second is smoother. By the third, it starts to feel intuitive.
At Freshrooms, we carry everything you need across all levels: ready-to-fruit blocks if you want to start as simply as possible, all-in-one grow bags and liquid cultures for the next step up, and sterile substrate bags and mushroom spawn for when you're ready to do more by yourself. All shipped across Europe.
Browse our growing supplies at freshrooms.eu
Can you really grow mushrooms at home without special equipment?
Yes - and you need less than most people think. At the simplest level (a ready-to-fruit block), all you need is a spray bottle with water. For an all-in-one grow bag you'll also need gloves and isopropyl alcohol, both of which you can pick up at any hardware store like OBI for a couple of euros. No lab, no autoclave, nothing expensive.
What is the easiest mushroom to grow for beginners?
Oyster mushrooms as a group are the most beginner-friendly - with one exception: king oyster can be tricky and isn't the best starting point. Blue oyster, pearl oyster, yellow oyster and pink oyster are all solid choices depending on the season. Lion's mane is also a great option for beginners and tends to do well even without perfect conditions.
How long does it take to grow mushrooms at home?
It depends on the variety. Oyster mushrooms and lion's mane typically take around 3-5 weeks from inoculation to first harvest. Shiitake is a different story - it can take anywhere from 6 to 12 weeks. If you want results quickly, oysters are the way to go.
What temperature and humidity do mushrooms need?
Temperature varies by species - each variety has its own preferred range, which is covered in detail in the varieties section above. Humidity is more universal: most mushrooms fruit best at 80-90% relative humidity. Just as important is fresh air exchange - CO2 buildup is one of the most common reasons pins don't form or develop poorly. Humidity and fresh air are equally critical, not one or the other.
What is an all-in-one grow bag?
An all-in-one grow bag is a single pre-sterilised bag that contains everything you need to grow mushrooms at home - substrate, grain, a filter patch and an injection port. You inoculate it with a liquid culture syringe, wait for colonisation, then initiate fruiting. Because nothing needs to be mixed in open air, contamination risk is low. It's one of the simplest and most reliable ways to grow gourmet mushrooms at home.
Everything you read about, we make. Lab-sterilized substrates, fresh cultures, and everything you need to grow.
Shop the full range